Replacing head gasket on 2000 Chrysler Neon.
Continued from "Timing belt replacement"
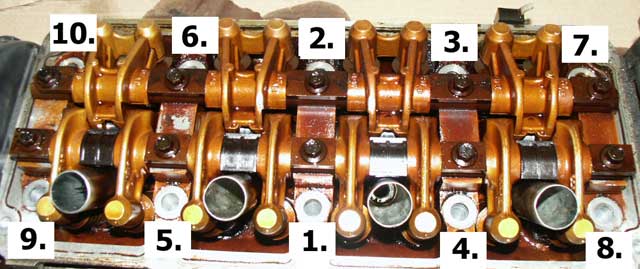
Inspecting the head. Turn the head upside down (see Picture 1), while turning the camshaft sprocket watch all your valves and make sure they open and close properly. You can also use break cleaner and spray the top of the valve when in closed position. Watch if the cleaner is leaking through the closed valve. If not proceed to next valve. In our case valves were bent so bad that you could see through the gap when in closed position (see Picture 2).
To remove the valves you will need a special tool called Valve Spring Compressor (see Picture 3). The name says it all. By compressing the spring you will notice that the 2 half rings around the valve will open (see Picture 4), remove them and release the compressor. You may now remove the spring and your valve is ready to come out. Valve shouldn’t give you any trouble coming out, simply push it through with your thumb. You will also notice that the valve sits on a retainer (see Picture 5)(almost looks like a thimble with a hole in the middle). When you purchased the head gasket kit it should have come with a set of these as well. A retainer is easily removed by grabbing it with a pair of pliers and couple of gentle twists. Remove any dirt and oil from underneath the retainer and place a new one in its place. To install new valves simply reverse the above steps.
It is also recommended that you check the head for flatness. Especially if overheated surface will warp and not seal properly. If necessary take the head to machine shop and have it planed (resurfaced), any local machine shop will do this for you (approx. $150)
Removing the old gasket. You should purchase a gasket removal (Canadian Tire carries different types for around $7), usually comes in spray. Carefully spray the area where the old head gasket was, let sit for 10-15 minutes. Using a plastic or wooden scraper (not metal scraper) gently remove any residue on the bottom of the head and top of the engine block. For any stubborn place repeat the process. You can now replace other gaskets that came with the kit (air intake, exhaust manifold, etc.) You should now be ready to start putting everything back together.
Place the new head gasket on the engine block, make sure it sits properly
and in the right position. Place head on top of the engine, again make
sure it’s placed properly before inserting the bolts. Bolts need
to be tightened not only in a certain pattern (see Picture 6)but
also using the correct torque. This information is also provided with
the kit. For Chrysler Neon pattern is in four steps.
Step 1. You need to torque all 10 bolts at 25 ft-lbs
Step 2. Now torque all 6 center bolts to 50 ft-lbs
and 4 corner bolts at 35 ft-lbs.
Step 3. Torque all 6 center bolts to 50 ft-lbs (again)
and 4 corner bolts at 35 ft-lbs (again)
Last Step – you need to tighten all 10 bolts
in the given sequence an extra ¼ turn (90%)
You are now officially finished with the head and you may begin the process of putting everything back together. One more of thing to add is the timing belt itself. You need to position it properly. There is a notch on the bottom crankshaft and on the casing of the engine block (they have to mach), also there is a notch on the top camshaft sprocket and a notch on the rear timing belt cover (they have to match as well). Both intake and exhaust valves on piston 1 have to be in the upper (closed) position as well.
Things to watch for after the project complete. Keep an eye on your
oil level. Watch your antifreeze level as well. Watch the exhaust coming
out of your muffler, if your pistons or rings are damaged your car will
begin smoking. The thick white smoke (and it actually has a sweet smell
to it) means you’re burning antifreeze. Yes, it is possible that
your gasket is leaking on the inside and antifreeze is getting inside
the chamber and you’re burning it. Also keep an eye on the actual
head gasket, it is fairly easy to see it in the front of the engine
(for the back use a small mirror), check occasionally for leaks.
| Comments: | ||
| Thabang (10/11/2010 11:22:19 AM) | ||
| Hi...my Chrysler neon 2.o 16valve broke the timing belt over the weekend @ 205,000km. Does this mean that i am definitely going to go through all that you went through or is there a chance i can get away with it? | ||
| Phil (10/15/2010 7:13:35 PM) | ||
| Unfortunately neon has what they call interference engine which means once your timing belt breaks valves do whatever they want for a split second. There is not enough clearence for them to move clearly, they hit top of the head and bend, usually 1 or 2. Repair is costly as entire engine needs to be stripped, you're looking at minimum $2000 for the repair. Parts are fairly cheap if you decide to do it yourself, 90% of the cost is labor. | ||
| steve (11/25/2010 8:43:06 PM) | ||
| i paid 780$ to repair a cracked subframe on my 2000 neon.. mechanic said he went through 13 and all were rusted finally the 14th one he found was good condition...fair? ...now car is at pretty much 300km but does weird things like go in reverse when im stopped at a light and just last night i kicked it into reverse on my driveway and saw a large amount of smoke coming out before i kicked it back into drive not sure if smoke was from engine...is this the end of my neon? | ||
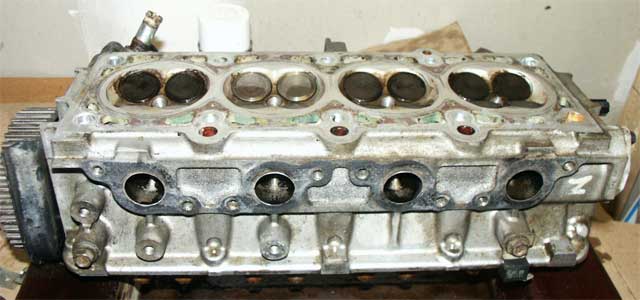
Picture 1 - View of the head turned upside down

Picture 2 - Bent valve (left)
new valve (right)
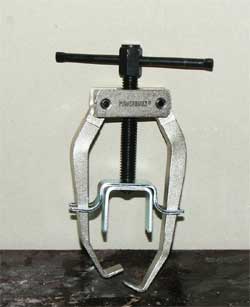
Picture 3 - Valve spring remover/compressor
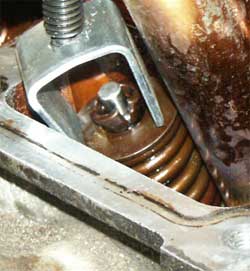
Picture 4 - Rings around the valve coming out after compressing spring
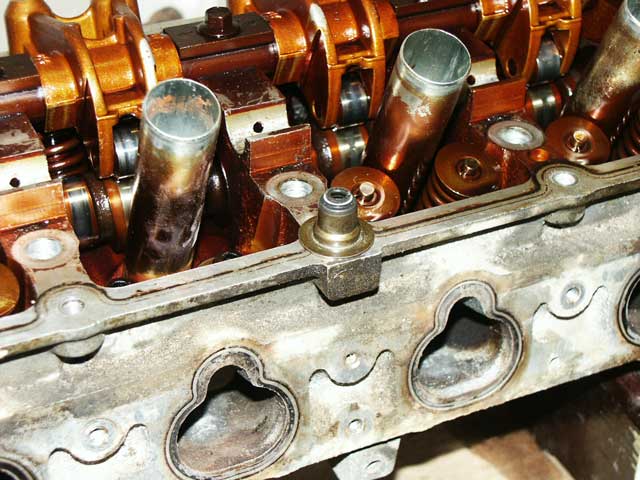
Picture 5 - Valve retainer removed
Picture 6 - Head tightening sequence
Your Comments:
| 10/11/2010 11:22:19 | Thabang | Hi...my Chrysler neon 2.o 16valve broke the timing belt over the weekend @ 205,000km. Does this mean that i am definitely going to go through all that you went through or is there a chance i can get away with it? |
| 10/15/2010 19:13:35 | Phil | Unfortunately neon has what they call interference engine which means once your timing belt breaks valves do whatever they want for a split second. There is not enough clearence for them to move clearly, they hit top of the head and bend, usually 1 or 2. Repair is costly as entire engine needs to be stripped, you're looking at minimum $2000 for the repair. Parts are fairly cheap if you decide to do it yourself, 90% of the cost is labor. |
| 11/25/2010 20:43:06 | steve | i paid 780$ to repair a cracked subframe on my 2000 neon.. mechanic said he went through 13 and all were rusted finally the 14th one he found was good condition...fair? ...now car is at pretty much 300km but does weird things like go in reverse when im stopped at a light and just last night i kicked it into reverse on my driveway and saw a large amount of smoke coming out before i kicked it back into drive not sure if smoke was from engine...is this the end of my neon? |
MORE FROM CDNAUTO

Canada gas tax breakdown per province - Each litre of gas you're buying, how much of that amount is going to your government? View breakdown across all provinces.
High gas prices? Think again. - So you think you're paying too much for gas?. Take a look at pricing of gas around the world and see how Canada stacks up against other countries.

With gas prices surpassing $1 dollar mark we take a look at other fuel
alternatives. Hybrid vehicles, CNG, Propane and other alternatives.
Read our article on propane
and natural gas

Diesel engine technology has been around for quite some time now. See list of Diesel vehicles that are currently available to you.